

· 4 min read
How to Prepare Photos for Client Selection in 8 Steps
Prepare photos for client selection in 8 steps: cull bad frames, even out color, export at 3000 px, keep original file names, split folders, set Shotpik rules.

How you prepare photos for client selection decides how fast clients choose and how smoothly your edits go afterwards. A set that is culled, evenly colored and split into clear folders helps clients decide without feeling overwhelmed. This guide covers 8 steps to take before you send the link.
Why it pays to prepare photos for client selection
Sending a thousand unculled frames tires clients out and stretches the selection over weeks. When you remove the bad frames and even out the color first, clients only compare photos worth seeing. Keeping the original file names means you can find the right RAW file once they finish, instead of hunting frame by frame.
Step-by-step guide
Step 1: Remove bad frames first
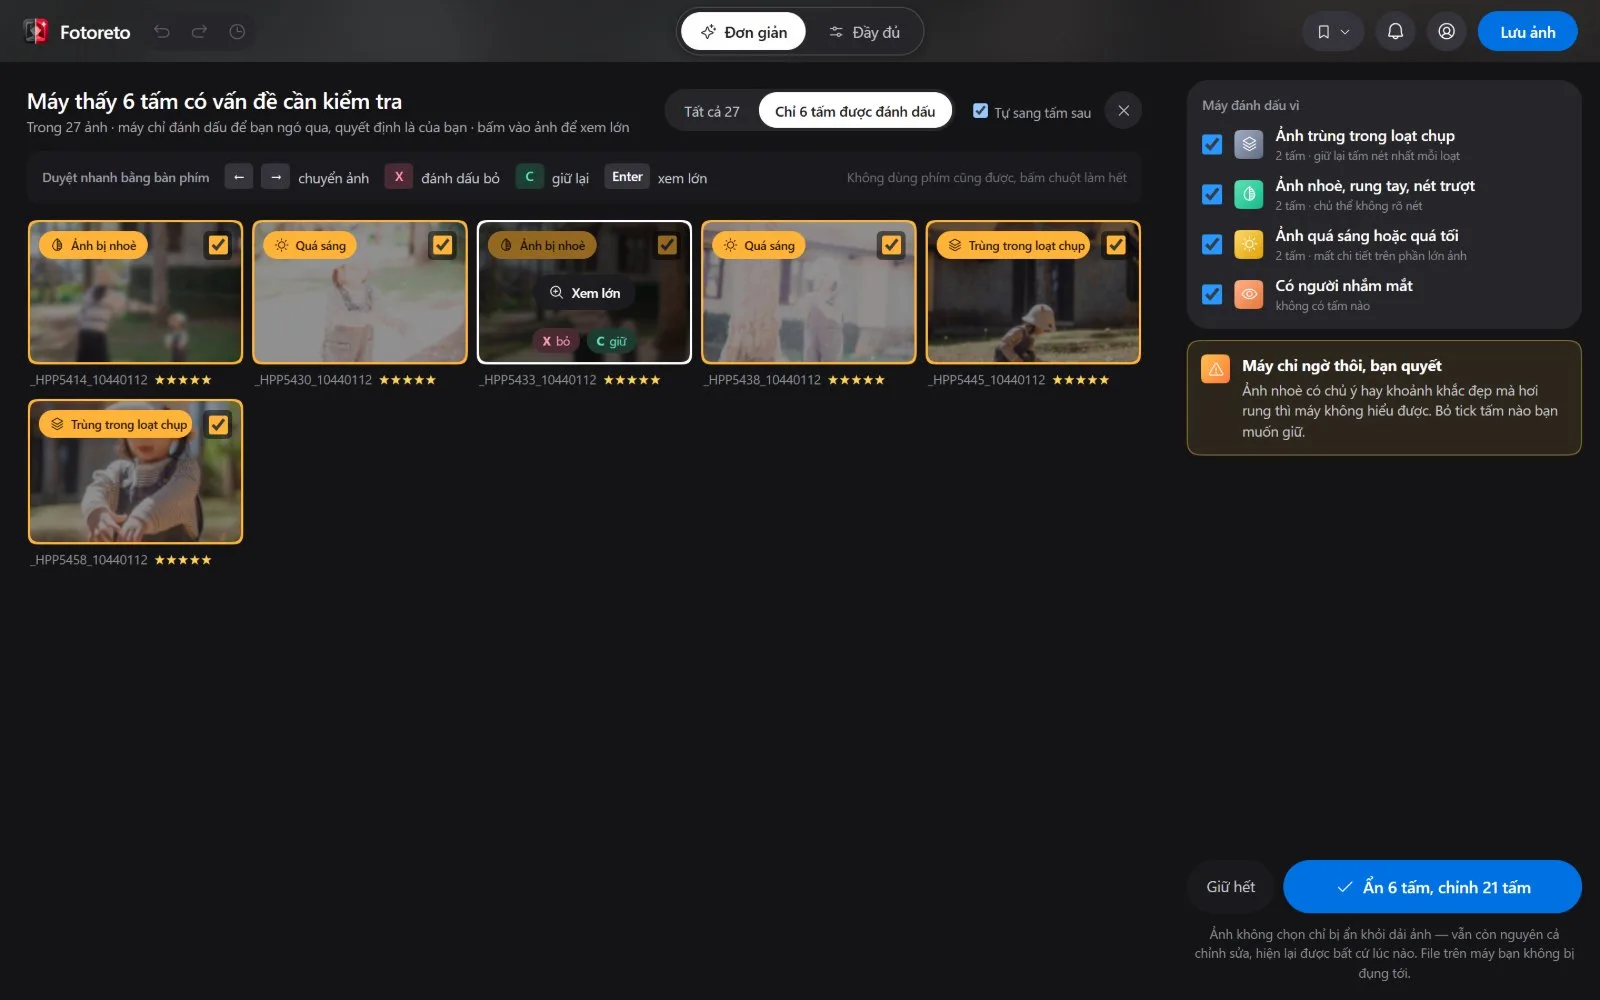
Open the folder in Fotoreto and use Cull. Fotoreto flags duplicates in a burst, blur, camera shake, missed focus, over or underexposure and closed eyes. Review them with X to reject and C to keep. Rejected photos are only hidden; the files on your drive are never deleted.
Step 2: Even out the color
Proofs do not need to be perfect, only clear and consistent across locations. Pick a master frame, click Auto adjust, then Sync to multiple photos with Auto-balance light for each photo left on. If you have a favorite look, choose it from Looks by HoangPhucPhoto or load your own Lightroom preset or .cube LUT before syncing.
Step 3: Export light but sharp files
Open Export and, under Photo size, choose Client proofing: a 3000 px long edge, sharp enough for clients to zoom in while files stay light and the gallery loads fast. For RAW files you can turn on Use embedded JPEG for a faster export. If you want clients to see your brand, add Add logo.
Step 4: Keep the original file names
In the same Export dialog, set File name pattern to original name. That way _DSC8509.ARW becomes _DSC8509.jpg on Shotpik. Once clients finish, Fotoreto uses the file name to match their picks with your RAW files, so renamed files will not match. Click Save as preset so you do not have to set this again.
Step 5: Split folders by part of the day
Export each part of the shoot into its own subfolder, for example Ceremony, Reception and Candids. Shotpik turns each folder into a tab, so clients jump to the part they want instead of scrolling through a thousand frames.
Step 6: Create the album on Shotpik
Put the folders on Google Drive and share them as "Anyone with the link", or keep them on your computer and use the Shotpik Agent app (no upload needed, but the computer must be on with the Agent open for clients to see photos). In Shotpik, click the button to create an album, paste the Drive folder link or pick the local folder, and fill in the album name and client name. Shotpik pulls in the photos and builds the tabs; your originals stay where they are and Shotpik only reads them.
Step 7: Set the selection rules
Set how many photos clients can pick to match their package, a selection deadline (clients see a countdown), a note for the client, watermark, album password and download permission. When clients are done, they click the button to complete their selection, which notifies you.
Step 8: Send the link
Click the button to send the album. You get a selection link for the couple, a view-only link for family and a QR code. Clients need no account and no app. What happens after they choose is covered in Wedding photo editing workflow.
Common pitfalls
- Renaming files on export, so the picks no longer match your RAW files.
- Putting every part of the day into one folder, which makes it hard for clients to find photos by moment.
- Leaving out a selection limit, so clients pick more photos than their package includes.
- Forgetting to share the Drive folder as "Anyone with the link", so Shotpik cannot read the photos.
Frequently asked questions
Do proofs need to be fully retouched
No. Proofs only need good exposure, clarity and even color. Save skin retouching and cleanup for the photos clients actually pick.
Can one Shotpik album hold several subfolders
Yes. Shotpik reads the subfolders and turns each one into a tab that clients can switch between.
How do clients know how long they have to choose
Set a selection deadline in the album rules. Clients see a countdown right on the selection page.
A careful prep pass before you send the link saves you a lot of follow-up questions and file hunting later.
Send your first album with Shotpik
Free forever, no card needed. Clients open the link and start choosing right away.
More posts
 Wedding Photo Editing Workflow: From Memory Card to Delivery
A wedding photo editing workflow in 8 steps: back up, cull and color the whole set in Fotoreto, send proofs on Shotpik, edit from feedback and deliver.
 How to Edit Photos Based on Client Feedback with Shotpik
Edit photos based on client feedback: open your Shotpik album in Fotoreto, match RAW files by name, filter client favorites and see comments and brush notes.