

· 4 min read
Wedding Photo Editing Workflow: From Memory Card to Delivery
A wedding photo editing workflow in 8 steps: back up, cull and color the whole set in Fotoreto, send proofs on Shotpik, edit from feedback and deliver.

A single wedding can produce thousands of frames. If you work out the order of steps from scratch every time, it is easy to miss photos, mix up file names and deliver late. This guide walks through a wedding photo editing workflow in 8 steps, from pulling the memory card to the moment your clients download their edited photos.
Why a fixed wedding photo editing workflow matters
A fixed workflow removes redundant steps and cuts mistakes when files change hands. With a few thousand frames per wedding, manual tracking leads to renamed files, missing photos and forgotten client requests. When every shoot follows the same path, you always know what is done and what is left, and clients get their photos on time.
Step-by-step workflow
Step 1: Back up the originals
Right after the shoot, copy every memory card to your computer and make at least one more copy on a separate drive. Only format the cards once you have two copies. This is the one step you cannot redo if you skip it.
Step 2: Cull with Fotoreto
Open the folder in Fotoreto and use Cull. Fotoreto flags duplicates in a burst, blur, camera shake, missed focus, over or underexposure and closed eyes. You review them quickly from the keyboard: press X to reject and C to keep. Rejected photos are only hidden from the filmstrip; the files on your drive are never deleted.
Step 3: Color the whole set at once
Pick a master frame and click Auto adjust to balance light and color. Then choose a look from Looks by HoangPhucPhoto (111 looks) or use your own Lightroom preset or .cube LUT. Click Sync to multiple photos and leave Auto-balance light for each photo on, so backlit frames and shaded frames still come out even.
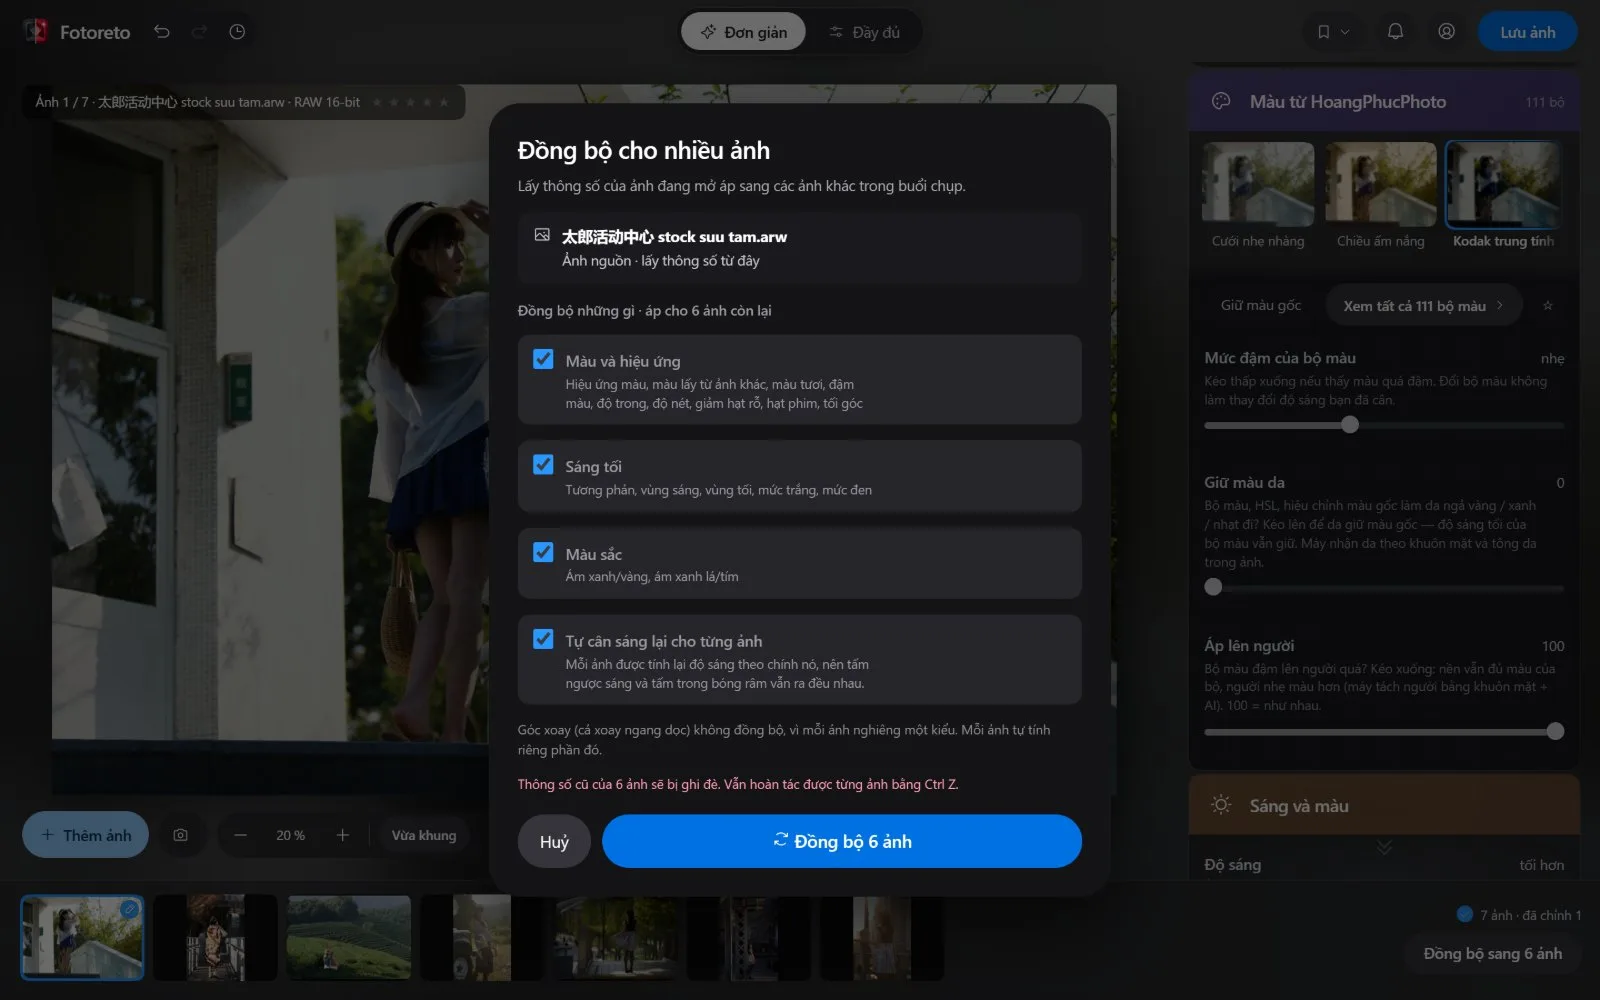
Step 4: Export proofs for client selection
Open Export and, under Photo size, choose Client proofing: a 3000 px long edge, sharp enough for clients to zoom in while the files stay light. Under File name pattern, choose original name so every proof keeps the same name as its RAW file. For RAW files you can turn on Use embedded JPEG for a faster export, and click Save as preset so next time it is one click.
Step 5: Create the Shotpik album and set the rules
Put the exported folder on Google Drive (shared as "Anyone with the link") or keep it on your computer and use the Shotpik Agent app. In Shotpik, click the button to create an album, paste the Drive folder link or pick the local folder, and fill in the album name and client name. Then set the selection rules: how many photos clients can pick, a selection deadline, a note for the client, watermark, album password and download permission.
Step 6: Send the link to your clients
Click the button to send the album. You get a selection link for the couple, a view-only link for family and a QR code. Clients do not need an account or an app. They heart photos, comment, draw notes on the image or add tags such as "Print large". When they finish, they click the button to complete their selection and you get a notification.
Step 7: Edit the picks from feedback in Fotoreto
In the album, click the button to edit from feedback, then the button to open Fotoreto. Fotoreto opens with the album link filled in. Choose the folder with your original files and Fotoreto matches each photo by file name, showing the client's hearts, comments and brush notes on the right frames. Opened from a Shotpik album, Fotoreto's free plan has no 10-photo limit. The full walkthrough is in How to edit photos based on client feedback.
For the portraits your clients picked, you can also use AI face skin retouch, AI face stray hair removal or AI clothing wrinkle removal (Premium).
Step 8: Deliver the edited photos on Shotpik
Export the edited photos to their own folder, upload that folder to Google Drive and add it to the edited photos section of the album. Clients open the same link as before to view and download, with no new link to wait for.
Common pitfalls
- Renaming files when exporting proofs, so in step 7 they no longer match the RAW files.
- Using Shotpik Agent and then shutting down the computer or closing the Agent, so clients open the link and see no photos.
- Skipping the selection deadline, so the album sits for weeks and your delivery date slips with it.
- Grading each frame on its own instead of syncing the set, which takes longer and leaves colors uneven between frames.
Frequently asked questions
Do clients need to install an app to choose photos
No. Clients open the link you send and can view and choose photos right away in a phone or desktop browser, without creating an account.
How do I protect my photos when I share the link
In the album rules on Shotpik, turn on a watermark, set an album password and decide whether clients can download photos.
Does culling in Fotoreto delete my original files
No. Rejected photos are only hidden from the filmstrip and the files stay in the folder. Fotoreto processes photos on your computer and does not upload them.
Run the same workflow for every wedding and post-production gets noticeably lighter, while your clients get their photos on time.
Send your first album with Shotpik
Free forever, no card needed. Clients open the link and start choosing right away.
More posts
 How to Prepare Photos for Client Selection in 8 Steps
Prepare photos for client selection in 8 steps: cull bad frames, even out color, export at 3000 px, keep original file names, split folders, set Shotpik rules.
 How to Edit Photos Based on Client Feedback with Shotpik
Edit photos based on client feedback: open your Shotpik album in Fotoreto, match RAW files by name, filter client favorites and see comments and brush notes.